
Picture the scene: it is a warm Saturday afternoon, the grill is going, there is cold drink nearby, and you are cooking outside in a space that genuinely works — a proper worktop to prep on, storage that keeps everything within reach, and enough room to actually enjoy the process rather than constantly dashing back through the house.
That is what a DIY outdoor kitchen actually delivers, and it is more achievable than most people think. You do not need a massive budget, a contractor on speed dial, or a degree in construction. What you do need is a clear plan, the right materials, and the willingness to spend a couple of weekends building something you will use for years.
Outdoor kitchens have become one of the most sought-after home improvements for good reason. They extend the usable footprint of your home, they genuinely change how you cook and entertain, and they add real value to a property. But the versions you see in glossy magazines — all polished granite and built-in refrigerators — can easily run into tens of thousands of dollars when professionally installed.
The Cinder Block Grill Station

Cinder blocks are the unsung hero of DIY outdoor kitchens. They are cheap, widely available, heat-resistant, and genuinely durable — and they can be stacked into a functional grill station in a single afternoon with no tools more sophisticated than a spirit level and some mortar.
The basic approach is simple: arrange cinder blocks in a U-shape or L-shape, leaving a gap sized precisely for your grill to slide into flush with the surrounding surface. Fill the hollow cores with sand for added stability and to create a non-combustible base. Lay a piece of cement board or a cut-to-size concrete paver as a prep surface on either side of the grill slot, and you have a functional outdoor kitchen station for well under $300.
The beauty of cinder blocks is their flexibility. Not happy with the layout? Rearrange them. Moving to a new house? Take them with you. For anyone who wants to test the outdoor kitchen concept before committing to a permanent structure, a cinder block setup is the ideal starting point.
Wooden Pallet Outdoor Kitchen

Wooden pallets have been repurposed into virtually every piece of furniture imaginable over the past decade, and outdoor kitchen stations are one of the most practical applications. A well-constructed pallet kitchen can provide generous counter space, integrated storage, and real character for a remarkably small outlay.
The key is starting with the right pallets. Look for heat-treated pallets stamped with HT — these have been treated with heat rather than chemicals and are safe for use around food preparation. Avoid any pallets stamped with MB, which indicates methyl bromide treatment and is not safe for this purpose.
Stack pallets to your desired counter height — typically two high — and secure them together with carriage bolts or heavy-duty screws. Sand thoroughly, apply a quality exterior wood sealant, and finish with a countertop surface of your choice. Outdoor ceramic tiles bonded with exterior adhesive are an excellent and very affordable countertop option that transforms the overall appearance.
Concrete Countertop Island with Timber Frame

Poured concrete countertops are one of the best value upgrades you can make to any outdoor kitchen structure, and they are far more achievable as a DIY project than they appear. The process involves building a simple mold from melamine-coated board, mixing and pouring bagged concrete, and then grinding and sealing once cured.
Build your island frame from pressure-treated timber or steel studs — the frame does not need to be beautiful since it will be clad later. Wrap the frame in cement board before applying your finished exterior surface. The concrete countertop sits on top, overhanging by an inch or two on the front and sides for a finished, professional look.
Concrete can be tinted any color during mixing, embedded with stones, glass, or other decorative elements, and shaped to include draining grooves, integrated trivets, or even a built-in herb planter at one end. A quality penetrating sealer applied every year or two keeps it stain-resistant and easy to clean.
Stone Veneer Kitchen Island

The stone veneer outdoor kitchen is the DIY approach that most often makes people stop and ask whether you hired a professional. The finished result genuinely looks like natural stone construction, but the actual process involves a lightweight timber or steel frame clad with cement board and then faced with thin veneer panels that adhere with exterior tile adhesive.
Stone veneer comes in a huge range of styles — stacked slate, river rock, fieldstone, limestone, and more — and costs significantly less than actual stone construction. The panels are lightweight enough to be handled by one person and cut easily with an angle grinder or wet tile saw.
Frame your island with pressure-treated 2×4 or 2×6 lumber, sheathe it in cement board, and then tile the exterior faces with your chosen veneer. A granite or porcelain countertop — look for offcuts and remnants at stone yards, where they are often sold cheaply — completes the transformation. The finished island genuinely looks like a custom-built permanent structure, because structurally, that is exactly what it is.
Rolling DIY Kitchen Cart

Not every outdoor kitchen needs to be a fixed permanent structure. A well-built rolling kitchen cart gives you full cooking capability with complete flexibility — move it to wherever the shade is, roll it out for parties and store it under cover when not needed, or take it to a neighbor’s place for a shared event.
Build the frame from exterior-grade hardwood or powder-coated steel, mount it on four heavy-duty swivel casters with individual locking brakes, and incorporate your essential features: a prep surface, storage drawers or shelves, a side shelf that folds down when not in use, and hooks for frequently used tools.
A built-in cooler compartment — essentially a lined box sized to accept a standard cooler insert — is one of the most useful additions to a rolling outdoor kitchen cart. It keeps drinks and ingredients cold without requiring a separate cooler taking up floor space nearby.
Rustic Farmhouse Outdoor Kitchen from Reclaimed Timber

If you appreciate the beauty of aged, imperfect materials, a farmhouse-style outdoor kitchen built from reclaimed timber is one of the most satisfying builds you can undertake. The worn character of salvaged wood — old barn timber, weathered fence posts, repurposed scaffolding boards — creates a kitchen that looks like it has always been there and has decades of good meals behind it.
Source your timber from architectural salvage yards, renovation skips (with permission), or online marketplaces where homeowners sell leftover materials. Check structural integrity carefully before using reclaimed timber for a load-bearing frame — any soft, punky, or heavily compromised wood should be used decoratively rather than structurally.
Pair reclaimed timber framework with a poured concrete or slate tile countertop, add open shelving made from matching salvaged boards, and install a deep farmhouse sink if your outdoor setup has access to water. The result is a kitchen with genuine character that no amount of money could buy if you tried to replicate it from new materials.
L-Shaped Concrete Block Kitchen with Built-In Smoker

For serious outdoor cooks, an L-shaped concrete block kitchen with an integrated smoker is the build that everything else has been leading up to. The L-shape configuration creates a generous cooking zone on one arm and a prep and serving zone on the other, while the built-in smoker sits at the corner junction — the most structurally logical and thermally efficient position.
Concrete blocks — the denser, heavier variety rather than hollow cinder blocks — are ideal for any installation that will be adjacent to a smoker or wood-burning grill, because they absorb and radiate heat rather than concentrating it in one spot. The thermal mass of a concrete block kitchen actually improves the cooking environment immediately around it.
Plan the smoker opening dimensions before you begin laying blocks. The opening needs to accommodate your specific smoker unit with clearance on all sides for access and for heat circulation. Lay fire-rated mortar for any courses that will be directly adjacent to the smoker chamber.
Simple Brick BBQ and Prep Station
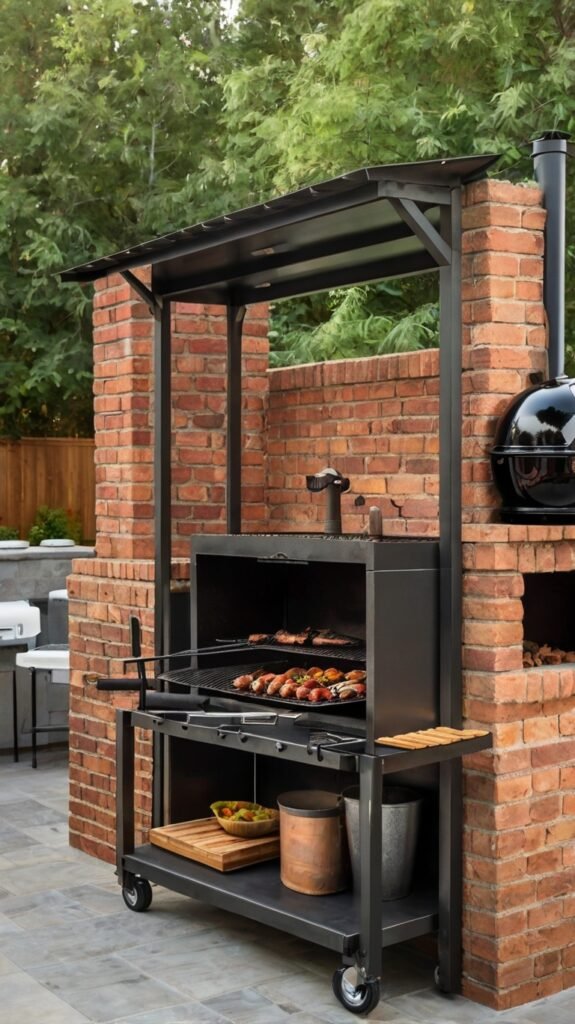
Brick is one of the most time-tested materials for outdoor cooking structures, and a classic brick BBQ station combined with a prep surface on either side remains one of the most functional and durable outdoor kitchen setups you can build yourself.
The basic brick BBQ is a project that many competent DIYers can complete over a long weekend with a bit of patience and a willingness to learn basic bricklaying technique. The key is using fire bricks for the inner chamber — standard house bricks do not handle direct flame well and will crack over time — and standard outdoor bricks or concrete blocks for the outer surround and wings.
Add steel rods or angle iron across the firebox opening at intervals to support grill grates at different heights, giving you flexibility between direct high-heat grilling and lower, slower cooking positions. Extend the brick structure on one or both sides to create integrated prep surfaces finished with heat-resistant tile.
Modular Stainless Steel Outdoor Kitchen

Stainless steel is the material of professional kitchens for good reason — it is hygienic, extremely durable, resistant to rust when maintained correctly, and easy to clean. A modular outdoor kitchen assembled from stainless steel cabinet units brings that professional kitchen sensibility into the backyard at a manageable cost.
Marine-grade or 304-grade stainless steel outdoor cabinet modules are available from specialist outdoor kitchen suppliers and some online marketplaces. They can be configured in any combination, bolted together for stability, and anchored to a concrete pad for permanence. A stainless steel countertop fabricated to size from a local metal fabrication shop ties the units together and creates the unified, commercial kitchen look.
The maintenance requirements of stainless steel are relatively light — regular wiping with a damp cloth, occasional treatment with a stainless steel cleaner to remove water marks and finger prints, and periodic inspection of any bolted connections that may need tightening after seasonal temperature changes.
Outdoor Pizza Oven Kitchen Station

An outdoor pizza oven as the centrepiece of a DIY kitchen station is one of the most rewarding builds on this list. A wood-fired pizza oven cooks a genuine Neapolitan pizza — blistered base, leopard-spotted crust, perfectly melted cheese — in 60 to 90 seconds at temperatures that no domestic indoor oven can approach. The experience of cooking pizza this way is categorically different from anything you can achieve indoors.
Pre-cast pizza oven kits have made this project significantly more accessible than it once was. The oven dome and floor come as cast refractory concrete components that you assemble, insulate, and encase in an outer shell of your choice — brick, stone, stucco, or render. The whole assembly sits on a robust base structure that also provides generous prep and storage space.
Build the base from concrete blocks or brick to a height of around 90 to 100 centimetres — comfortable working height for pizza making. The oven sits at counter level, with an integrated landing area in front of the oven mouth for managing pizzas in and out. Add flanking prep surfaces and you have a complete cooking station organized entirely around the oven.
Compact Apartment Balcony Outdoor Kitchen

Limited space is not a barrier to outdoor cooking. A compact balcony outdoor kitchen — properly planned for the constraints of a small space — can accommodate a two-burner gas hob, a small prep surface, condiment storage, and enough counter space to actually work comfortably, all within a footprint of less than two metres wide.
The key to a balcony outdoor kitchen is vertical thinking. Wall-mounted folding shelves that drop down when needed and fold flat when not in use reclaim space without sacrificing function. A narrow rolling cart with a fold-out top provides additional prep surface that disappears when the cooking is done.
Always check your building’s policy on outdoor cooking appliances before installing anything on a balcony, and ensure any gas appliances used are specifically rated for outdoor use. A bioethanol or electric cooking appliance is often the safest and most policy-compliant option in apartment settings.
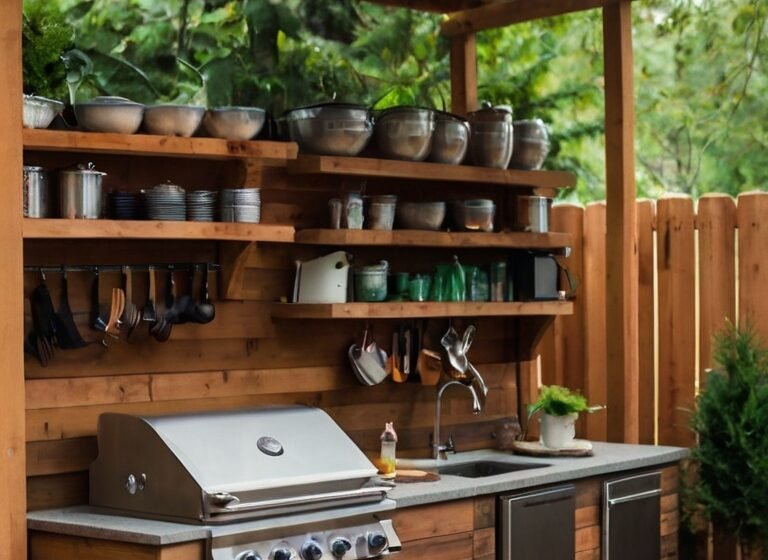
Timber Pergola Kitchen with Full Roof Cover

Adding a pergola or full roof structure over your outdoor kitchen is the upgrade that transforms a functional cooking station into an outdoor room. A covered kitchen can be used regardless of weather, extends the season significantly, and creates a sense of defined space that makes the area feel like a genuine room addition to the house.
A basic pergola built from pressure-treated posts and beams with a louvred or polycarbonate roof provides weather protection while maintaining airflow — important when there is cooking smoke to dissipate. The posts also become anchor points for lighting, fans, and shelving that would be impossible to install in an open outdoor setting.
Check local planning regulations before building any permanent roofed structure. Many jurisdictions have permitted development rules that allow covered outdoor structures up to a certain size without planning permission, but the thresholds and conditions vary significantly.
Upcycled Cabinet Outdoor Kitchen

Old kitchen cabinets — the kind that homeowners rip out during renovations and sell cheaply on online marketplaces — can be transformed into a very credible outdoor kitchen setup with some preparation, the right sealants, and a new countertop.
The catch is that standard kitchen cabinets are not designed for outdoor exposure. The MDF and particleboard used in most flat-pack cabinetry absorbs moisture and will swell, delaminate, and eventually disintegrate if left unprotected outdoors. The solution is thorough sealing — multiple coats of exterior primer and paint on every surface including the interior — and positioning the cabinets under a covered structure or pergola where they are protected from direct rain.
Replace any hardware with stainless steel or powder-coated equivalents that will not rust, and fit the cabinets with a new countertop in a material genuinely suited to outdoor use — concrete, porcelain tile, or solid granite. The resulting kitchen can look remarkably polished at a fraction of the cost of purpose-built outdoor cabinetry.
Outdoor Kitchen with Built-In Refrigerator and Sink

Adding a refrigerator and a sink to a DIY outdoor kitchen moves it from a cooking station to a genuinely self-contained outdoor kitchen — one where you can manage an entire meal from start to finish without stepping inside once.
Outdoor-rated under-counter refrigerators are specifically designed for ambient temperature extremes and humidity that would damage a standard domestic appliance. Do not use an indoor refrigerator outdoors — it is a safety and reliability risk. Outdoor models cost more but last significantly longer in outdoor conditions and are specifically rated for the task.
For the sink, the plumbing approach depends on how permanent you want the installation to be. A fully plumbed sink connected to the domestic supply and drainage is the most convenient option but requires professional plumbing work at the connection points. A simpler alternative uses a large tank for fresh water supply and a separate greywater collection tank for drainage — no plumbing connection required, just periodic filling and emptying.
Minimalist Concrete and Steel Outdoor Kitchen

For those who prefer clean lines and industrial materials over rustic warmth, a minimalist outdoor kitchen in concrete and steel is a striking option that photographs beautifully and ages exceptionally well outdoors.
The structural elements are built from steel angle or square hollow section, welded or bolted into a rigid frame. Concrete board sheaths the frame, and the exterior faces are either left as raw concrete board, rendered smooth with an exterior render, or clad in large-format porcelain tiles in a concrete or stone effect. The countertop is poured concrete, ground to a smooth finish and sealed.
The design language is deliberately stripped back — no ornamental details, no decorative hardware, just honest materials expressed cleanly. The cooking appliances are built-in and flush-mounted, and any storage is hidden behind door panels rather than displayed on open shelves. The result is a kitchen that feels genuinely architectural rather than decorative.
Planning Your DIY Outdoor Kitchen: What to Decide Before You Start
Layout and Location
The single most important planning decision is where in the garden your outdoor kitchen will sit and how it will relate to the house. Proximity to the kitchen door matters — carrying heavy items, managing hot dishes, and running back for forgotten ingredients all become easier the shorter the distance. But proximity needs to be balanced against smoke direction, noise if you have close neighbors, and sun exposure throughout the day.
Consider the path of the sun across your garden. A kitchen that is in direct western sun throughout late afternoon and evening — the hours when you are most likely to be using it — will be uncomfortable in summer. Shade from the house itself, from a tree, or from a purpose-built pergola can make an enormous difference to outdoor cooking comfort.
Think about the prevailing wind direction at your location. You want smoke from the grill to blow away from the house and from your seating area, not into it. A quick observation of which way your garden trees and plants lean in the wind gives you a reliable indication of the prevailing wind direction.
Choosing the Right Materials for Your Climate
What works beautifully in a dry Mediterranean climate may fail within a season or two in a wet, cold northern climate. Understand your local conditions before committing to materials.
Timber needs regular sealing or oiling in wet climates and benefits from a covered position year-round. Cinder blocks and concrete blocks are very weather-resistant but should be capped with a waterproof material on top to prevent freeze-thaw damage in climates with hard winters. Stainless steel performs well everywhere but needs occasional maintenance to prevent surface oxidation, particularly near the sea. Natural stone is extremely durable but heavy, and some softer stone varieties can be affected by frost penetration over many years.
Gas, Electric, or Charcoal: Choosing Your Heat Source
The cooking appliances you choose shape the entire outdoor kitchen design, because the fuel source determines the installation requirements. Gas cooking — whether natural gas piped from the house or bottled LP gas — delivers the convenience of instant ignition and precise heat control but requires either a gas line installation or a dedicated storage solution for gas cylinders.
Charcoal and wood-burning cooking is the most straightforward from an installation perspective — no fuel lines, no electrical connections — but requires ongoing fuel procurement and more involved post-cooking cleanup. The flavour argument for charcoal and wood is genuine; the convenience argument goes firmly to gas.
Electric cooking appliances are the easiest to install in terms of fuel management but require a weatherproof outdoor electrical supply, which itself needs professional installation if it does not already exist in the garden.
Budget Planning: Where to Spend and Where to Save
Not every element of a DIY outdoor kitchen deserves equal investment. The places worth spending more are the cooking appliances — a quality grill or hob will perform better, last longer, and be safer than a cheap alternative — and the countertop surface, which is the material you will use and touch most frequently.
The places where you can save significantly without meaningful compromise are the structural frame, which simply needs to be robust and level, and the exterior cladding, where budget options like concrete board render, affordable ceramic tile, and cost-effective stone veneer deliver very similar visual results to premium alternatives.
Essential Features Every Outdoor Kitchen Should Include
Adequate Workspace
The single most common complaint about under-planned outdoor kitchens is insufficient workspace. You need somewhere to prepare ingredients before they go on the heat, somewhere to rest hot items as they come off, somewhere to plate up, and somewhere to put down a drink and a pair of tongs simultaneously without anything landing on the ground. Plan for more worktop than you think you need — you will use it.
Weather Protection for Appliances
Even outdoor-rated appliances benefit from protection when not in use. A grill cover is the minimum; a fully covered kitchen structure is the ideal. UV exposure degrades plastic components and surface finishes over time, rain accelerates corrosion in joints and connections, and debris accumulation in burner ports causes ignition problems. Whatever level of cover you can provide pays dividends in appliance longevity.
Lighting for Evening Use
An outdoor kitchen without adequate lighting is a kitchen you stop using at dusk. Plan lighting at two levels: overhead ambient light for general visibility in the cooking area, and task lighting positioned directly above the cooking and prep surfaces where precision matters. LED strip lighting under overhead shelves or cabinet units is one of the most effective and affordable task lighting solutions for outdoor kitchens.
Storage That Makes Sense
Storage in an outdoor kitchen is most useful when it is organized around actual use patterns. Cooking tools go near the grill. Prep equipment goes near the prep surface. Condiments, oils, and seasonings go somewhere that does not expose them to direct heat. Plan your storage layout before building so that cabinets and shelves end up in the positions where they will actually be used rather than wherever they happened to fit.
Final Thoughts: The Outdoor Kitchen You Build Yourself
There is something genuinely satisfying about cooking in a space you built with your own hands. Every meal prepared in a DIY outdoor kitchen carries a small additional pleasure that no professionally installed version quite replicates — the knowledge that this space exists because you planned it, built it, and made it work.
The 17 ideas in this guide range from projects you can complete in a single weekend with basic tools to more ambitious multi-week builds that require careful planning and a broader range of skills. All of them are achievable without a contractor, and all of them deliver something that a bare patio and a freestanding grill simply cannot — a proper outdoor cooking space that is organized, functional, and genuinely a pleasure to use.
Start where your budget and skill level sit comfortably. A cinder block grill station built this weekend is worth infinitely more than an elaborate kitchen design that stays in a planning document indefinitely. The best outdoor kitchen is the one that actually gets built — and then actually gets used, season after season, for as long as the backyard is yours.