

Something shifts the first time you cook an entire meal outside without setting foot in your indoor kitchen. No sprinting back through the back door for a spoon you forgot. No carrying a platter of chicken across a wet lawn trying not to drop anything. Just you, the grill, a proper worktop, and everything you need within arm’s reach.
That is the version of outdoor cooking most people want but very few actually have — because the gap between a freestanding grill on a bare patio and a properly set-up outdoor kitchen DIY feels too big to bridge. It looks like something you either pay a contractor a small fortune to build, or you go without.
Neither of those things is true. An outdoor kitchen is one of the most achievable home improvement projects you can take on yourself, and it scales beautifully across budgets, skill levels, and backyard sizes. A weekend and a few hundred dollars can produce a genuinely functional setup. A few weekends and a bit more investment can produce something that looks indistinguishable from a professional installation.
The key is knowing which approach suits your situation — your space, your cooking habits, your tools, your budget, and how permanent you want the result to be. The 16 outdoor kitchen DIY ideas in this guide cover all of that, from the quickest weekend wins to the more ambitious multi-stage builds that deliver results you will still be proud of a decade from now.
1. The Cinder Block Foundation Kitchen
If there is a single outdoor kitchen DIY project that delivers the best ratio of results to effort, this is it. Cinder blocks are inexpensive, available at every hardware store, genuinely heat-resistant, and require no specialist skills to work with. You can build a functional L-shaped or U-shaped kitchen station from cinder blocks in a weekend with nothing more than a spirit level, a rubber mallet, and some construction adhesive or mortar.
The standard approach is to arrange blocks in your chosen footprint, leaving a precise gap for your grill to drop into flush with the surrounding surface. The hollow cores of the blocks can be filled with sand for stability, used as-is for lightweight storage, or filled with concrete and rebar for maximum permanence. Cap the prep surfaces with cement board, large-format outdoor tile, or concrete pavers and you have a genuinely solid outdoor kitchen surface for a fraction of what you would pay for anything purpose-built.
The visual finish can be whatever you want it to be. Paint the blocks, render over them, tile them, or face them with thin stone veneer — all of these work, and all of them transform the look from utilitarian to genuinely attractive.
Estimated Budget: $180 to $450 for materials, depending on size and finish chosen.
Skill Level: Beginner. No specialist knowledge required. A spirit level and patience are the main tools needed.
Pro Tip: Stack one course of blocks dry before committing to mortar or adhesive. This lets you verify your measurements, check grill clearances, and adjust the layout before anything becomes permanent.
2. Timber Frame with Hardie Board Cladding

A timber-framed outdoor kitchen is one of the most flexible DIY structures you can build, because the frame is straightforward to construct with basic carpentry skills and the exterior can be finished in virtually any material. The key is using pressure-treated timber for all structural members — standard construction timber will rot relatively quickly when exposed to outdoor conditions.
Build the frame from 4×4 posts and 2×4 rails, sheath it with cement board (also known as Hardie board or fibre cement board), and then finish the exterior in whatever suits your outdoor aesthetic: painted render, outdoor ceramic tile, stone veneer, or even a simple painted finish. The cement board sheathing protects the timber frame from moisture and provides a stable substrate for any tile or render finish.
This approach is particularly well-suited to homeowners who are comfortable with basic carpentry and want design flexibility. The frame can be configured in any shape, sized to fit any available space, and designed around whatever cooking appliances you already own or plan to purchase.
Estimated Budget: $400 to $900 depending on size, timber grade, and cladding material chosen.
Skill Level: Intermediate. Basic carpentry skills and familiarity with a circular saw are helpful.
Pro Tip: Apply a bead of exterior silicone sealant at every joint between cement board panels and around any openings before tiling or rendering. These joints are the most vulnerable points for water ingress into the timber frame.
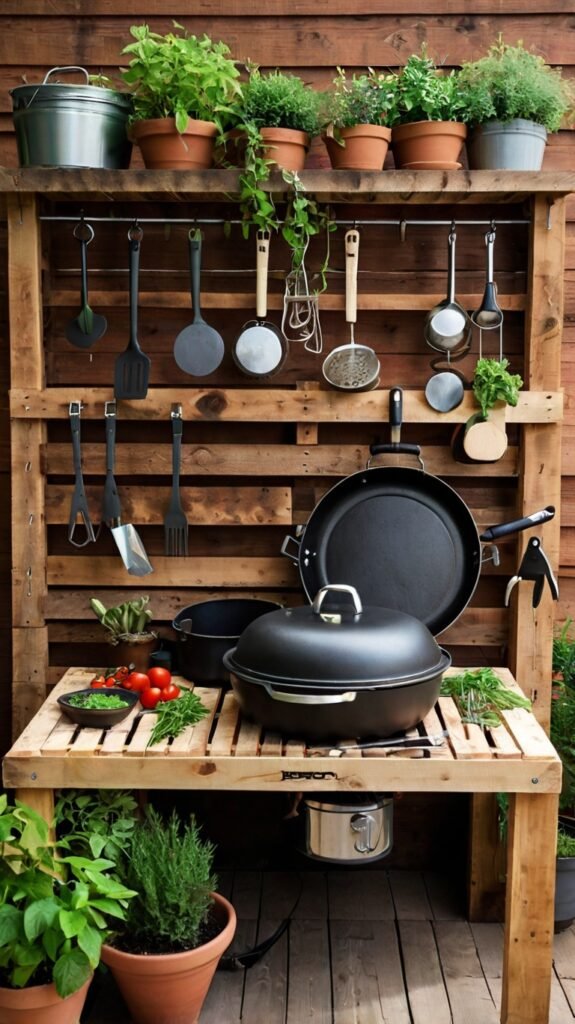
3. Repurposed Pallet Grill Station

Wooden pallets have funded more creative DIY projects than almost any other material, and a grill station is one of the most practical applications. The appeal is obvious — pallets are cheap or free, the slatted timber aesthetic suits outdoor spaces naturally, and the built-in voids and gaps are genuinely useful for hanging tools, storing equipment, and keeping essentials accessible.
The non-negotiable starting point is sourcing the right pallets. Look for heat-treated pallets marked with the letters HT on the side — these have been treated with heat rather than chemical pesticides and are safe for use around food preparation. Never use pallets marked MB, which indicates methyl bromide fumigation and is not food-safe.
Sand all surfaces thoroughly before doing anything else, working through progressively finer grits to get a smooth, splinter-free finish. Apply a quality exterior wood sealant or decking oil — two to three coats, paying particular attention to end grain — before the structure is assembled and before any cooking happens near it. The countertop surface should be something more robust than raw pallet timber: outdoor ceramic tile bonded with exterior adhesive, a concrete paver cut to size, or a sheet of food-safe stainless steel are all excellent options.
Estimated Budget: $80 to $250, with pallets sourced free or cheaply and the budget going toward hardware, sealant, and countertop surface.
Skill Level: Beginner to Intermediate. Basic woodworking and tile-laying skills are helpful for a polished finish.
Pro Tip: Reinforce the structure at every corner with heavy-duty metal angle brackets before applying the exterior finish. A pallet station that shifts and wobbles over time is a safety issue around cooking appliances — solid corner connections prevent this entirely.
4. Concrete Block BBQ with Integrated Smoker
For the outdoor cooking enthusiast who takes their craft seriously, a concrete block BBQ with an integrated smoker is the outdoor kitchen DIY project that pays dividends every single weekend. Concrete blocks — the denser, heavier type rather than the hollow cinder block variety — provide extraordinary thermal mass that absorbs and radiates heat evenly, genuinely improving the cooking environment around them.
Plan the layout carefully before laying a single block. The smoker opening needs to be dimensioned precisely for your specific smoker unit, with clearance on all sides for both access and heat circulation. Any courses adjacent to the smoker chamber should be laid with fire-rated mortar rather than standard cement mortar, which can degrade under sustained high heat.
The cooking zone should be sized around your grill insert, with the grill dropping in flush with the surrounding surface for a clean, built-in appearance. Flanking prep surfaces in tile or concrete extend the usable workspace on either side. A stainless steel rod or rail mounted across the front of the structure provides a hanging point for tools — one of those small details that makes the difference between a kitchen that is merely functional and one that is genuinely well-organized.
Estimated Budget: $600 to $1,200 for a full build including smoker integration.
Skill Level: Intermediate. Basic bricklaying technique is helpful. A building square and spirit level are essential.
Pro Tip: Fire up your new smoker very gradually over the first four or five sessions — small fires that build in size progressively. This slow curing process drives moisture out of the block and mortar gradually rather than all at once, preventing the cracking that ruins the structural integrity of a rushed first fire.
5. Poured Concrete Countertop on Any Frame

Poured concrete countertops are one of the most impactful upgrades you can add to any outdoor kitchen structure — whether it is a cinder block base, a timber frame, or an existing flat surface that needs a proper cooking worktop. The process is genuinely achievable as a DIY project, and the result looks substantially more sophisticated than the effort involved might suggest.
Build the mold from melamine-coated particleboard, which releases from cured concrete cleanly and gives a smooth underside finish. Mix your concrete according to the product instructions, adding a liquid concrete fortifier to the mix to improve crack resistance — this is an inexpensive addition that significantly improves the durability of the finished countertop. Add color pigment to the mix if you want something other than standard grey.
Pour in stages if the countertop is large, vibrating the mold regularly by tapping the sides firmly with a rubber mallet to release trapped air bubbles before they set. After 48 to 72 hours of curing, remove the mold, grind any rough spots with a wet polisher, and apply a penetrating concrete sealer. Reseal annually and the surface will remain stain-resistant and easy to clean for many years.
Estimated Budget: $120 to $280 for materials, depending on countertop size and color pigment chosen.
Skill Level: Intermediate. The mold-building and mixing process is manageable, but attention to leveling and curing time is essential.
Pro Tip: Cast any sink cutouts and mounting holes before pouring rather than cutting them afterward. Cutting cured outdoor concrete with a standard saw is genuinely difficult — planning the openings into the mold takes minutes and saves hours.
6. Stone Veneer Island with Granite Remnant Countertop

The stone veneer outdoor kitchen island is the project that reliably produces the most impressed reactions from visitors, largely because the finished result looks indistinguishable from solid stone construction. The actual process involves a lightweight frame — timber or steel stud — sheathed in cement board and then faced with thin stone veneer panels that adhere with exterior tile adhesive and mortar.
Stone veneer panels are available in a wide range of styles — stacked slate, river cobble, limestone ledger, and fieldstone among the most popular — and they cut cleanly with an angle grinder fitted with a diamond blade. The panels are thin and lightweight, easy to handle solo, and genuinely forgiving to work with compared to full-thickness stone.
For the countertop, visit local stone yards and ask specifically about remnants and off-cuts. Stonemasons regularly produce off-cuts from larger jobs that are the perfect size for an outdoor kitchen countertop and are sold cheaply or sometimes given away free. Granite remnants are particularly valuable here — genuinely heat-resistant, completely weatherproof, and beautiful in a way that no tile or concrete alternative quite matches.
Estimated Budget: $500 to $1,100 for a full build, with the countertop cost depending heavily on remnant availability.
Skill Level: Intermediate. Tile-laying experience is helpful for the veneer work. The frame construction is standard carpentry.
Pro Tip: Apply a bead of exterior silicone in a matching color at all inside corners of the stone veneer work. Stone panels meeting at a corner are a natural water ingress point — a neat bead of sealant here, tooled smooth, makes the corner waterproof without being visible.
7. Modular Stainless Steel Kitchen System

Not every outdoor kitchen DIY project involves building from raw materials. Modular stainless steel outdoor kitchen systems — purpose-designed cabinet units in marine-grade or 304-grade stainless steel that bolt together in configurable arrangements — allow you to create a professional-quality outdoor kitchen setup without any construction work beyond a level base and some basic tool competency.
The modules typically include base cabinets with internal shelving, drawer units, refrigerator housings, grill surrounds, and sink units that combine into whatever layout your space requires. A custom-fabricated stainless steel countertop from a local metal fabrication workshop ties the modules together visually and adds the unified, commercial kitchen look that elevates the whole setup.
The maintenance of stainless steel outdoor kitchen units is straightforward — regular cleaning with a damp cloth in the direction of the brushed grain, occasional treatment with a dedicated stainless cleaner for water marks, and periodic inspection of all connections. The material’s durability means a quality stainless steel outdoor kitchen setup will outlast most other material choices by a significant margin.
Estimated Budget: $800 to $3,500 depending on the number of modules and appliances included.
Skill Level: Beginner to Intermediate. The assembly process is essentially flat-pack furniture on a larger scale.
Pro Tip: Specify 304-grade stainless steel as a minimum. Cheaper grades marketed as stainless steel — sometimes labelled 201 or 202 — are significantly less resistant to surface rust and will discolor within a season or two in an outdoor environment.
8. Rolling Outdoor Kitchen Cart with Cooler

The rolling outdoor kitchen cart is the most underrated approach on this list, and it suits a wider range of situations than most people initially consider. A well-built rolling cart with quality locking casters gives you a fully functional outdoor kitchen station with complete spatial flexibility — move it into shade, position it for a party layout, shelter it under cover when rain arrives, or store it away completely in winter.
Build the frame from exterior hardwood or welded steel angle, sized to your specific requirements and finished to your aesthetic preference. Install four heavy-duty swivel casters with individual locking mechanisms — the locking function is not optional, because a cart that moves while you are managing a hot pan is a genuine safety risk. Locking casters cost more than non-locking equivalents but earn that cost back immediately in safety and stability.
A built-in cooler compartment is the single most useful feature addition to any rolling outdoor kitchen cart. Line an appropriately-sized internal compartment with food-safe foam insulation and install a drain plug at the base — the resulting cooler keeps drinks and ingredients cold for a full day of outdoor cooking without any separate cooler occupying floor space nearby.
Estimated Budget: $280 to $550 for materials and casters.
Skill Level: Intermediate. Woodworking or basic metalworking skills required for the frame construction.
Pro Tip: Add a fold-out side shelf on at least one face of the cart. A hinged shelf that folds flat when not in use adds a full extra work surface that disappears when you need to move the cart — one of the most practical features you can build in for almost no additional cost.
9. Wood-Fired Pizza Oven Station

A wood-fired pizza oven as the anchor of a DIY outdoor kitchen station is the project that generates the most genuine excitement in backyard entertaining — and the food it produces justifies every hour of the build. A properly heated wood-fired oven reaches temperatures of 400 to 500 degrees Celsius. At that temperature, a Neapolitan-style pizza cooks in 60 to 90 seconds, with a blistered, charred base and perfectly melted cheese that no domestic oven — regardless of price — can replicate.
Pre-cast refractory concrete pizza oven kits have made this project far more accessible than it was a decade ago. The dome and floor components come ready-made and require only assembly, insulation, and encasing in an exterior shell of your choice. The external finish can be brick, stone, render, or tile — the refractory components inside handle all the actual heat work.
Build the supporting base structure to a working height of around 90 to 100 centimetres — this is comfortable for pizza making and general food preparation. The base provides generous storage space inside for wood, tools, and pizza equipment. Extend the base on at least one side to create a landing area in front of the oven mouth and additional prep surface for managing pizzas and toppings.
Estimated Budget: $450 to $900 for kit and base materials. Custom-built domes without a kit run higher.
Skill Level: Intermediate to Advanced. The base construction is straightforward masonry. The oven assembly requires patience and careful following of kit instructions.
Pro Tip: Run at least five progressively larger curing fires in a new pizza oven before ever cooking in it at full temperature. Each fire should be larger than the last and run for at least an hour. This slow process drives trapped moisture from the refractory components without causing the thermal shock cracking that ruins a rushed oven.
10. Classic Brick BBQ with Side Prep Wings

The classic brick BBQ is one of the oldest outdoor kitchen DIY projects in the book, and it has remained popular for the simple reason that it works. A well-built brick BBQ is genuinely durable, looks appropriate in almost any garden setting, and provides a cooking surface that improves with age as the firebox seasons from repeated use.
The critical material choice is in the firebox lining. The interior chamber must be built from fire bricks — standard construction bricks cannot handle the thermal cycling of repeated high-temperature fires and will crack over time. The exterior can be any outdoor-rated brick or concrete block you choose, since it never experiences the direct heat that the inner face does.
Extend the brick structure on one or both sides of the firebox to create prep surfaces. These wing areas can be finished with ceramic or porcelain tile for a heat-resistant, easy-clean surface. Install steel rods or angle iron across the firebox opening at two or three different heights, giving you multiple cooking positions: direct high heat close to the fire for searing, and higher positions for slower, gentler cooking with the lid on.
Estimated Budget: $200 to $480 for materials including fire bricks.
Skill Level: Beginner to Intermediate. Basic bricklaying is the main skill required. A running bond pattern is the simplest to execute well.
Pro Tip: Soak your bricks in a bucket of water for at least 45 minutes before laying. Dry bricks pull moisture from the mortar too rapidly, resulting in weaker joints. Pre-wet bricks allow the mortar to hydrate and cure correctly, producing much stronger joints throughout the structure.
11. L-Shaped Kitchen with Built-In Bar Seating

The L-shaped outdoor kitchen with bar seating is the layout that most fundamentally changes the social dynamic of outdoor cooking. One arm of the L contains the cooking zone — grill, prep surface, storage — while the other arm extends into a bar counter at a height of 90 to 95 centimetres, comfortable for bar stools, where guests can sit and be genuinely part of the cooking rather than standing at a distance waiting.
This configuration works with almost any structural approach. You can execute an L-shaped layout in cinder blocks, concrete blocks, timber frame, or masonry brick — the shape is a layout decision rather than a material one. The bar seating arm is typically built to the same structural specification as the cooking arm, with the raised counter height being the only design difference.
The counter overhang on the bar seating side needs careful planning. A minimum of 25 to 30 centimetres of overhang beyond the face of the structure provides adequate knee clearance for someone seated on a standard bar stool. Less than this and the seating position is uncomfortable; more than about 40 centimetres without a support bracket underneath and the counter edge risks cracking under load.
Estimated Budget: $700 to $2,000 depending on structural approach, size, and countertop material.
Skill Level: Intermediate. Requires more planning than a straight run kitchen, but the structural techniques are the same.
Pro Tip: Install an electrical conduit run inside the bar counter structure during the build, capped at both ends. Even if you do not need outdoor power right now, having the conduit in place means adding a weatherproof socket later requires running cable through a pre-existing route rather than cutting into a finished structure.
12. Farmhouse Outdoor Kitchen from Salvaged Materials
If you are drawn to character, imperfection, and the beauty of materials with a history, a farmhouse outdoor kitchen built from salvaged and reclaimed sources is genuinely one of the most satisfying builds on this list. Reclaimed timber, salvaged stone, repurposed sinks, second-hand cast iron hardware — these materials bring a warmth and authenticity that no amount of money spent on new materials can replicate.
Source timber from architectural salvage yards, construction site skips with permission, and online classified marketplaces where homeowners sell leftover renovation materials. Check structural integrity carefully — any timber that is soft, crumbling, or heavily compromised by rot should be used decoratively rather than structurally. Sound reclaimed timber treated with exterior oil is as durable as new timber and far more characterful.
The farmhouse outdoor kitchen celebrates visible joinery, mixed materials, and the beauty of handmade things that are not quite perfectly level. Open shelving from old scaffold boards, a deep ceramic sink from a salvage yard, a countertop from a reclaimed door — each element tells a story, and together they create a kitchen that feels genuinely lived-in and personal rather than showroom-perfect.
Estimated Budget: $200 to $600, with cost highly dependent on salvage sourcing success.
Skill Level: Intermediate. Good carpentry instincts and a willingness to adapt plans when salvaged dimensions do not match expectations.
Pro Tip: Treat every piece of reclaimed outdoor timber with two full coats of penetrating exterior oil before installation, including all cut surfaces and end grain. Reclaimed timber is often more porous than new timber and benefits from generous oil treatment to restore water resistance before outdoor exposure.
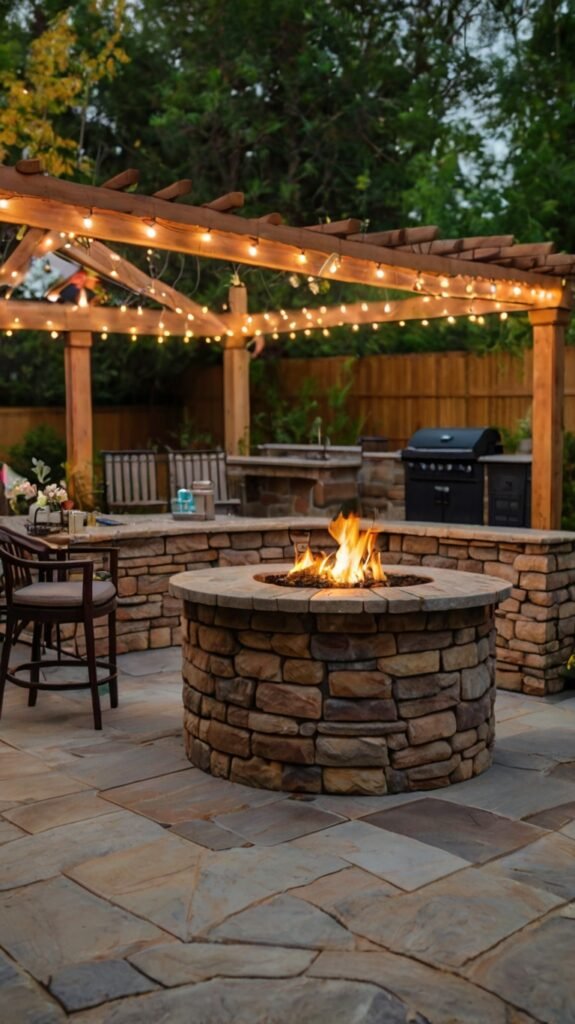
13. Covered Pergola Kitchen with Ceiling Fan
Adding a covered pergola structure above your outdoor kitchen changes the category of the space from an outdoor cooking station to a genuine outdoor room — one that can be used regardless of light rain, that stays cooler in summer afternoon heat, and that remains usable well into the evening thanks to the naturally sheltered environment for lighting.
A basic pergola for an outdoor kitchen does not need to be elaborate. Four posts, a beam structure overhead, and either a louvred roof for adjustable shade and ventilation, a clear polycarbonate roof for weather protection while maintaining light, or a fixed timber-slat pergola that provides partial shade are all effective. The posts become anchor points for pendant lights, ceiling fans, and wall-mounted storage that would be impractical in an open outdoor setting.
A ceiling fan installed under the pergola roof is one of the highest-impact additions you can make to covered outdoor kitchen comfort. In summer, it creates a constant light breeze that makes cooking in warm weather pleasant rather than exhausting. In cooler weather, reversed fan direction circulates warm air from cooking downward rather than allowing it to escape through the roof vents.
Estimated Budget: $600 to $2,500 depending on pergola size, materials, and roof type.
Skill Level: Intermediate to Advanced. Post-setting in concrete footings and overhead beam work require confidence with heights and structural basics.
Quick Note: Check local planning regulations before building any permanent roofed structure over a certain size. Most jurisdictions have permitted development thresholds — knowing the limits before you build is far simpler than discovering a compliance issue afterward.
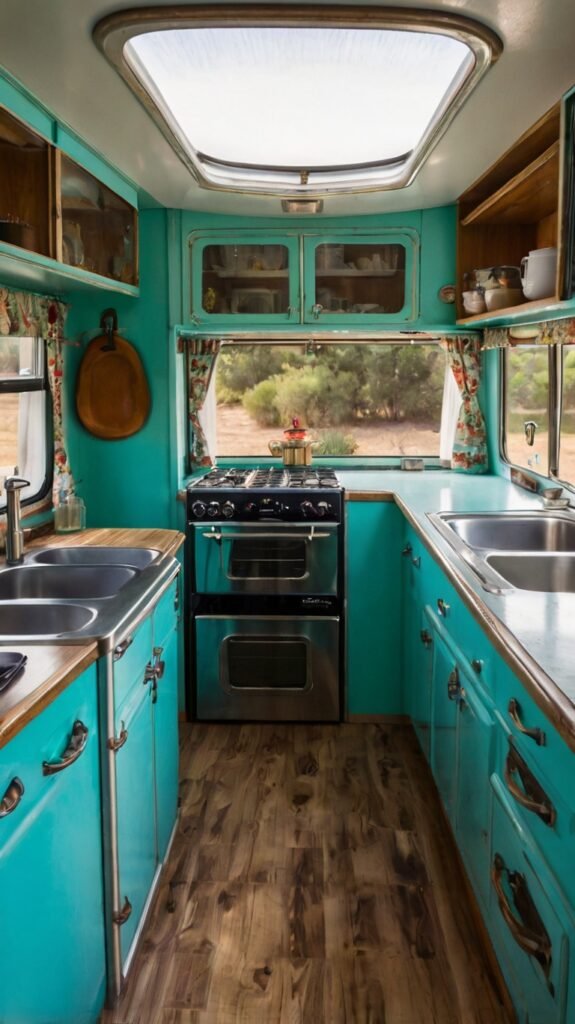
14. Compact Balcony or Small-Space Outdoor Kitchen

Limited outdoor space is not a reason to abandon the outdoor kitchen DIY idea — it is simply a different design constraint that leads to different solutions. A small balcony, a narrow side return, or a compact courtyard can accommodate a genuinely functional cooking space with thoughtful vertical planning and multifunctional furniture choices.
The key is thinking in three dimensions rather than just floor area. Wall-mounted folding shelves that hinge down when cooking and fold flat against the wall afterward reclaim surface area without occupying floor space. A slim rolling cart with a fold-out side table provides additional prep surface that disappears when the cooking is done. A wall-mounted magnetic tool rail keeps utensils off the limited worktop entirely.
Cooking appliances for compact spaces should prioritize functionality per footprint. A quality two-burner gas hob on a compact base gives more cooking versatility than a large single-burner setup. A kamado-style ceramic grill occupies a small footprint relative to its cooking capacity and doubles as a smoker, an oven, and a grill in a single unit — genuinely the highest functionality-to-footprint ratio of any outdoor cooking appliance.
Estimated Budget: $300 to $700 for a compact but well-equipped setup.
Skill Level: Beginner to Intermediate. The constraints of a small space actually simplify many structural decisions.
Pro Tip: Use the vertical wall surface immediately adjacent to the cooking area for a grid-style wall organizer with adjustable hooks and shelves. These systems hold knives, tools, spice containers, and small equipment entirely off the worktop — essential in a small-space outdoor kitchen where every centimetre of surface counts.
15. Outdoor Kitchen with Plumbed Sink and Refrigerator

Adding running water and refrigeration to a DIY outdoor kitchen crosses the threshold from a cooking station to a self-contained outdoor kitchen — one where an entire meal can be managed from start to finish without stepping indoors once. This is the setup that fundamentally changes outdoor entertaining, removing every friction point between great food and the outdoors.
The sink plumbing approach depends on how permanent you want the installation. A fully plumbed connection to the domestic water supply and drainage is the most convenient long-term option but requires professional plumbing work at the connection points to meet building regulations. A simpler tank-based system — a pressurized fresh water tank fed by a small 12V pump, with a greywater collection container for drainage — requires no plumbing connections and is installed by the DIYer in a day.
The refrigerator must be an outdoor-rated unit, specifically designed to operate across the wider ambient temperature range and humidity levels of an outdoor environment. Indoor refrigerators fail relatively quickly in outdoor conditions and represent both a reliability and a safety risk. Quality outdoor-rated under-counter units are significantly more expensive than indoor equivalents but are engineered for the task and will last many years in outdoor service.
Estimated Budget: $900 to $2,800 depending on refrigerator model and plumbing approach.
Skill Level: Intermediate to Advanced. The plumbing connection, if permanently connected, requires a qualified plumber for the water and drainage hookup points.
Pro Tip: Position the refrigerator unit on the shadiest side of the kitchen layout. A refrigerator operating in direct summer sun works significantly harder, runs more frequently, uses more energy, and reaches the end of its service life sooner than one operating in shade. Even a small roof extension or solid side panel to shield the unit from direct sun makes a measurable difference.
The Planning Decisions That Determine Whether Your Outdoor Kitchen Actually Works
Layout Principles That Stand the Test of Time
The triangle principle used in indoor kitchen design — positioning the cooker, sink, and storage within easy reach of each other to minimise steps — applies equally outdoors. Before drawing a single line, think about the movement between your grill, your prep surface, and your storage and ask whether the layout allows you to manage all three without crossing back and forth unnecessarily.
Face the grill away from the prevailing wind direction where possible. This keeps smoke blowing away from the cook and from guests seated nearby. If your space does not allow a wind-optimal orientation, a small windbreak structure on the windward side — even a simple masonry half-wall — makes an enormous difference to grill performance and cooking comfort.
Electrical Supply: Plan It Before You Build
Outdoor electrical supply is the single element most often overlooked in outdoor kitchen DIY planning, and it is also one of the most difficult and expensive to add retrospectively once the kitchen is built. Plan for outdoor-rated socket outlets positioned within the kitchen structure from the beginning — even if you do not immediately need them, having the outlets in place means adding appliances later requires plugging something in rather than cutting into a finished kitchen.
All outdoor electrical installations require weatherproof socket outlets rated IP44 or higher, RCD protection on the circuit, and compliance with local electrical regulations. In most jurisdictions, the connection to the mains supply requires a qualified electrician even if the socket outlet installation itself is DIY.
The Countertop Decision: Getting the Surface Right
The countertop is the most used surface in any kitchen, and outdoor conditions make the material choice more consequential than it would be indoors. The surface needs to handle heat from cooking pots and dishes, UV exposure that causes some materials to fade or yellow over time, wet weather that can damage porous surfaces, and freeze-thaw cycles in climates with cold winters.
Porcelain tile — particularly large-format outdoor-rated porcelain — is the most practical all-climate countertop choice for most DIY outdoor kitchens. It is genuinely impervious to moisture, UV stable, heat-resistant, easy to clean, and available in almost any color and surface effect imaginable. Granite is beautiful and extremely durable but requires sealing and is vulnerable to salt spray in coastal locations. Poured concrete is endlessly customizable but needs annual resealing. Stainless steel is supremely functional but scratches visibly and gets extremely hot in direct summer sun.
The Most Common Outdoor Kitchen DIY Mistakes and How to Avoid Them
Building Without Checking Local Regulations
Permanent outdoor structures — anything built on a fixed foundation or attached to the house — may require planning permission or building permits depending on their size, location, and your local jurisdiction. The specifics vary enormously between countries, regions, and even between individual local authorities within the same country. Checking before building takes an hour and costs nothing. Discovering a compliance issue after the kitchen is built can be genuinely expensive to resolve.
Underestimating the Workspace Needed
The most consistent complaint about existing outdoor kitchens is insufficient worktop space. In the excitement of planning the grill installation, the smoker position, and the sink location, the actual prep workspace gets squeezed into whatever is left over. Build in more worktop than you currently think you need — you will never regret extra workspace, but you will regret too little every single time you cook.
Choosing Materials for Looks Rather Than Durability
Some materials that look spectacular in photographs are poorly suited to outdoor conditions. Raw MDF and standard particleboard will delaminate in moisture. Untreated softwood will rot within a couple of seasons. Materials with high-gloss painted finishes chip and flake from the thermal cycling of an outdoor environment near cooking appliances. Choose materials rated for outdoor exposure first, and let aesthetic preferences guide you within that category.
Skipping the Foundation
Building any outdoor kitchen structure directly on bare soil or an unlevel surface is the planning decision that causes the most structural problems over time. Soil movement, drainage issues, and frost heave all cause outdoor structures built without a proper base to shift, crack, and deteriorate. A concrete slab, a compacted gravel base, or at minimum a set of properly set concrete pad footings under key structural points provides the stable base that a permanent outdoor kitchen requires.
The Outdoor Kitchen That Gets Built Is the Best Outdoor Kitchen
Reading about outdoor kitchen DIY projects and actually building one are separated by a gap that nobody can cross for you — you just have to start. And the honest truth about starting is that the first step does not need to be ambitious. A cinder block grill station that cost $200 and took one weekend to build will improve your outdoor cooking experience more than an elaborate plan that never gets off the ground.
The ideas in this guide cover a genuine range of scale, budget, and complexity. Some are afternoon projects. Some are multi-weekend commitments. A few are serious undertakings that reward patience and careful planning. All of them are achievable without hiring a contractor, and all of them produce a result that transforms how you use your outdoor space.
Start where your confidence and budget sit comfortably. Build something that works. Use it until you understand what you actually want from your outdoor kitchen — because using a real outdoor kitchen teaches you things about your cooking habits and preferences that no amount of planning or reading ever could. Then, if you want to expand or improve, do that. The outdoor kitchen is one of those projects that tends to grow organically over time, each season adding something that the previous version made obvious was missing.